Thursday, August 16, 2018

Back To School Lunchbox Stress Solved!


This is my first back to school season as a work from home momma; and I made a promise to myself that I would do this year better. Every other year, I have gone into a new school year in this stressed out state of disorganization and mom self-doubt. That was not fun for me and, even more importantly, a super uncool way for my little man to kick off a brand new year (when there is already so much overwhelm for young people, I certainly do not want my stress to add to my son's!)

My goal for myself and my family was to get organized and lead off the 2018-2019 school year with solid, manageable plans to tackle everything from chores/homework juggling to (one of our biggest ongoing stressors)..."what's in my lunchbox?".

Our oldest kiddo is going into third grade this year. Since he was in preschool, we have discussed making healthy choices and eating well. Now that he is becoming more independent and involved in his own meal prep, we're really ramping up those convos! So, how can I can quell some of my own exasperation with the "what's going in my lunch?" question; and help my eight year old to balance thinking for himself and staying within the constrains of acceptable nutrition? Enter: The Color-Coded Lunchbox Chart.

I felt inspired by the colored portion containers that a popular eating plan recommends. It seemed like a perfect approach to keeping my son on task when we are putting his lunch box together by gently forcing him into nutritional balance. Keeping it real, if he had his complete freedom of choice in the matter, he'd opt to grab a Lunchable and a chocolate milk every single day. By allowing him to build his own lunch using color-coded food categories and containers, he's learning about keeping his preferences and choices in check.

To get started, first, my little dude and I had a chat about mutually agreeable food choices. For my son, he likes to have four food options in every lunch. We broke his lunchbox down into four color categories: red (the main eat), blue (fruit/veggie), green (starchy/fatty/crunchy) and purple (treat!).


The Main Eat: 
  • Meat, cheese and cracker
    • Cracker cuts of salami & pepperoni
    • Deli ham, turkey or roast beef
    • Rotisserie chicken
    • Sliced cheese or cheese stick
    • Wheat crackers (We like Kashi Original Seven Grain Crackers!)
  • Deli meat & cheese sandwich
  • Peanut butter & banana sandwich
  • Meat & cheese tortilla roll up
  • Hard boiled eggs
  • "Nachos" (*store the cheese and choice of toppings in one container and the chips separately to allow for scooping...no soggy chips!)
    • Tortilla chips
    • Shredded cheddar
    • Salsa 
    • Sliced black olives, leftover chicken, beef or pork (shredded or diced), beans
  • Graham crackers sandwiched with peanut butter
Fruit / Veggie:
  • Apple slices
  • Pear slices
  • Grapes
  • Banana
  • Applesauce cup
  • Blended fruit pouch
  • Strawberries
  • Clementine or mandarin orange
  • Fresh fruit salad
  • Carrot & celery sticks with ranch greek yogurt
  • Gerkin pickles
  • Black olives
  • Edamame
Starchy / Fatty / Crunchy:
Dairy / Treat:
  • Yogurt smoothie (We freeze our bottles and then they are perfectly thawed but chilled by lunch.)
  • Greek yogurt cup
  • Pudding cup
  • Buy milk at school (inevitably our son always opts for the chocolate milk!)
There is a lot of preparation and planning that goes into managing a family household (both at back to school time and beyond), helping your children eat well shouldn't have to be a source of stress...or constant debate. While I certainly don't have all of this mom business figured out, I do feel a bit more adept and organized when it comes to checking that lunch box off of the to-do list everyday. Thus far, we have successfully made it through the stress free prep of one school lunch...only 175 more to go!

**We omitted the "Drink" category from our lunch making because if my son doesn't buy milk at school, then he's drinking water. Yep. I'm that mom. If you prefer to include a beverage too than a fifth "Drink" option (ie. juice box, water bottle, lemonade...) could easily be added!


Tuesday, July 31, 2018

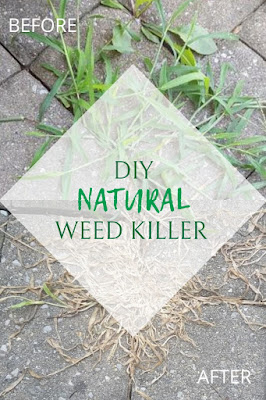
Kill The Weeds. Cut The Chemicals. I'm Making Homemade Weed Killer!


We have a huge amount of landscaping at our home; which is one of favorite things about our house. It also leads to a huge amount of shrubbery grooming and weed pulling. The most pesky weeds that we deal with are those strongly rooted suckers that start beneath the patio bricks and eventually coat your walkways in a sort of weed carpet (looks good, right?).

After hand-pulling all the weeds from our garden beds, my fingers and hammies were both screaming so I wanted to tackle our unsightly patio "rug" with a spray-on weed killer instead of sweating it out on my hands and knees any longer. Full disclosure: we had a LOT of overgrowth to deal with so I knew I was going to need some sort of herbicide to rain down upon large swaths of my backyard. Oh, the chemicals! Oh, the horror! Thus began my search for an effective (and safe) alternative to chemical weed sprays.

If you're cautious about using products containing Glyphosate (the active ingredient in Roundup and a chemical that has been linked to a variety of health concerns according to consumersafety.org) or 2,4-Dichlorophenoxyacetic acid (the active ingredient in a number of products including Ortho Weed-B-Gon which could pose fertility risks and environmental concerns according to the Natural Resource Defense Council) around your home, you are not alone! We grow food which our family eats in the same backyard that I am wanting to vanquish the weeds using a liquid killer. I'm not too keen on dousing my outdoor space (and subsequently all of my run-off water) with these potentially very toxic substances...which will then, more than likely, make it's way into my son's watermelon patch. Bummer, right? There had to be a better way. My solution: I was going to make my own natural weed killer spray...from scratch!

I started by doing a whole lot of Pinterest and Google digging and found that most DIY homemade weed killer sprays all contained the same two basic ingredients: white vinegar and salt. (Side note: I LOVE vinegar and we will definitely be discussing all of it's acidic goodness at a later date!)

After considering the various recipes I saw from others, I made my own trial batch of homemade natural weed killer. Three ingredients (all of which I already had at home). Super easy. And it worked!

Here's what I used:

- One gallon White Distilled Vinegar
- 1 cup Iodized Salt
- a 'One Mississippi' squeeze of Dish Soap
- One gallon Garden Sprayer (for application and storage)


Here's what I did:

1)  I poured out about 16ish ounces of the vinegar into a separate container (you'll add it back later) to make the mixing part of this job easier. 

2)  I added the squeeze of dish soap (I didn't measure because I read a number of recipes that included anywhere from a "dash" to 1/4 cup of dish soap so I kinda figured that this ingredient needn't be precise. Also, I don't think that the dish soap requires any sort of brand specification. Most others I noticed used Dawn but I used Seventh Generation because it's what I already had).

3) I sloshed that container around (keep a hand on your container cap so you don't cause a vinegary calamity!) rather vigorously. 

4)  I added the salt to the container...more vigorous slosh action to allow the salt to dissolve...and then I topped it off with the reserved vinegar.

Once my mixture was well-combined, I transferred my fresh batch of weed killer into a garden sprayer and got busy!


Here are my results:


My "weed carpet" prior to application...

… 24 hours after application...

… 48 hours after...

… one week later! So long suckers :)


A few notes from my DIY natural weed killer spray experience...

… The spray left a "ring" on the surrounding bricks (it left them looking damp and slightly darker than other untreated areas). This went away completely after the first rain but I imagine you could hose it off to accomplish the same thing if you're bothered by this side effect.

… While I found this recipe to be equally as effective as chemical based alternatives, this is a much slower acting potion. It took a full week for the weeds to die completely; but after that time, they pulled with almost no effort so it really did work to kill the roots!

… I will caution that I only used this on invasive weeds that were growing: between pavers and patio bricks, along the base of the garden beds and between sidewalk and driveway cracks. I did not test this mixture's safety when used to kill weeds that are growing in gardens and flower beds. Please test at your own risk!!

To sum it all up: the salt and vinegar based DIY homemade natural weed killer really did work, is free of nasty toxins, and it came in as a significantly less expensive finished product than commercially produced options. With name brand weed killers retailing, on average, at about $18.00, my initial financial investment in my project was about $15.00 (the garden sprayer was $9.99 at Rural King; Iodized Salt was about $0.50 at Aldi; White Vinegar is $2.21 per gallon at Sam's Club; various options available at Dollar Tree for just a buck) and refill batches will only cost about $2.50 per gallon. Awesome!

For me, DIY homemade weed killer spray, was a tried and tested success (yay!) and I definitely will not be purchasing conventional chemical products ever again in the future. Have you tried this recipe? Share your results and any tweaks you may have made in the comments!

Saturday, July 28, 2018

We Are Loaded House.

About Me: I read a lot. I write a lot. I've always considered myself a "reader" and a "writer". Now as a mother, I find that time is often not on my side when it comes to crafting a well-thought prose. Most of my recent writings (which I use very loosely) are grocery lists and my son's homework corrections. Furthermore, I have developed a love/hate relationship with reading. Why? Because most of my reading is done on a screen and, as a parent, I get lost. As quickly as I get lost in an Anita Shreve novel (love her!), I also get swept up in the "information" and "facts" of the internet. From the conflicting glory and grave warnings about vaccines to how to adequately clean your shower pouf, the internet is a vast sea of fiction and factoids. Wading through all of that information will make a sane person crazy...and send a mom on a mission!

About Loaded House: Our loaded house includes: two boys (a charismatic eight year old and a "chatty" eight month old), an 11 year old Akita and several house plants. What does your loaded house have in common with our loaded house? We all want what is best for our families and our dear little ones. That is a common bond among parents throughout millennia. It's primal. It's nature. Enter the world wide web. The internet and the opinions of very vocal Sanctimommies (You know? Those women who will ALWAYS do Mom better than you will ever be capable...and they aren't afraid to tell you how much better they do Mom either. Yeah, those moms) have had a tendency to leave me feeling confused, conflicted and overwhelmed. What is real and what is propaganda? It is consuming.

We are on a mission to do life differently. To find our own truth and be confident in the choices we make for our family. Sometimes this boils down to endless research and deducing of information. Other times, it simply means going with your gut. At Loaded House, we want to share our experiences and learn from others. We want to bridge the gap between work and home so that making a living, doesn't actually interfere with living. Our "why" is our boys. Our "why" is our peace of mind and our confidence in the decisions we make.

Our "why".

We are here to share. We will strive to be unbiased and well-informed. We will live well, do good and keep it simple.

Please join us on this journey. Read. Leave your own two cents. We don't want every thing in the world but we want to experience everything that the world has to offer...while having peace of mind. Let's be friends and help each other live well.

XOXO
Brianna
(The Lady of the Loaded House)